Photography

Feast for the Eyes: Food Photography Tips & Tricks

Camera phones have become the standby tech-weapon-du-jour for many of us. Like little documentarians we wander about recording our daily lives. We steal photos of our environments, pets, plants and people. A critical component to many of our lives is a habit that hardly escapes our scrutiny or our trigger finger, our meals.

Photo: Eunsan Huh

Photo: Eunsan Huh

Do you enjoy the aesthetics of a well prepared spread? Have you sought to record the radiance of a seasonal bouquet of produce? Maybe you’ve tried to nab a shot of your crispy chicken and sweet stamped waffle at brunch only to find that the image is anything but appetizing. Do not be foiled.

Consider this your first foray into the glamourous world of culinary creativity via your mobile phone. In the following weeks be on the look out for additional installments to this food photo compendium.

Each installment of this series will focus on both a behind the lens photography skill (so you get the perfect shot) and an Aviary editing tip (to help you enhance your image).

Behind the lens: Start by electing to take shots of vibrant, colorful, bright foods and meals. It doesn’t matter if your dinner is divine, if the color is monochrome and the texture is mushy, it’s hard to make the food look appealing. If dishes are covered in heaps of brown sauce (like Poutine), it will probably fall flat on your screen too. The more fresh and new the ingredients you select in cooking are, the better they will translate for your audience. Same with meals, do your best to edit yourself. Beautiful foods = beautiful photos.

Edit with Aviary:  Once you have pushed the “button” and taken your shots, you have another opportunity to spice up your masterpiece with the Aviary Food enhancement. Simply open “Enhance” once you’ve selected  your photo from the camera roll. Next, go to the Food tool. The sweet secret about this enhancement is that it boosts the vibrancy (not the saturation) of your provisions while increasing the contrast between smaller details, adds greater sharpness, and creates a vignette to draw the viewer’s eye toward the fetching fare.
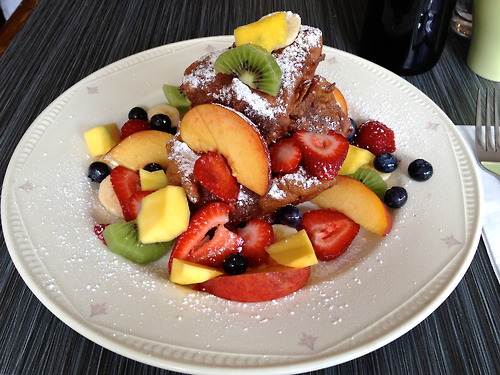
Photo: Eunsan Huh

Photo: Eunsan Huh

Give these simple techniques your best shot and surely the quality of your images will improve. Practice with different light angles, surfaces, and amounts of food to see what works best for you. Remember to have fun and find your Food Photography Signature Shot (see hyperlink to my last blog post). Bon Apetit!


Martha, Martha, Martha

Here at Aviary, we pay pretty close attention to what's trending on Buzzfeed (especially when cute animals are involved), so like everyone else, we were pretty amused when we saw the post about Martha Stewart's food photos. We think about both photography and food a lot around here, so thought we'd join the conversation. For starters, let's compare one of Martha's photos with a photo of the same dish taken by an Aviary staffer (incidentally, the author of this blog post). This watermelon goat cheese salad at Nougatine at Jean-Georges is mindblowingly tasty but somehow Martha manages to make it look entirely unappetizing.

See for yourself:

Taken by Aviary staffer Brannon

Taken by Aviary staffer Brannon

Taken by Martha Stewart

Taken by Martha Stewart

Martha, we love that you are tweeting your food photography, and the food is almost certainly delicious in real life, but let us help you out. Below are some tips and tricks we use to make our photos of food look as good as the food tastes. 
 

Photo credit: Ari Fuchs

Photo credit: Ari Fuchs


1. Ditch the flash.

We appreciate that most restaurants use ambient low lighting, so this can be tricky at times. Using a night setting in your mobile phone camera (with elbows on the table to stabilize the shot) can make a world of difference. If your photo is still too dark, try the Enhance tool in Aviary, which includes a powerful Illuminate option. 


Photo Credit: Mike Mignano

Photo Credit: Mike Mignano


2. Use a filter.

Even a photo that starts off rather mundane can transform into a visually appealing shot when a filter is applied. A great place to start is with Aviary's Foodie effect pack, which is designed to enhance those food shots and make your viewers' mouths water. 


Photo Credit: Mike Mignano

Photo Credit: Mike Mignano


3. Top-down composition.

Photos taken from directly above the plate will lend themselves to better symmetry, which is much easier on viewers' eyes. For example, a homemade breakfast sandwich and a cup of coffee can become a work of art using this technique.


Photo Credit: Emmi Hintz

Photo Credit: Emmi Hintz


4. Food in the air.

If a shot from above isn't quite doing the trick, try focusing on your edible subject in the foreground of your photo, and deliberately include the scene in the background. Your viewers will appreciate the narrative context, and your shot becomes that much more interesting. Try Aviary's Focus tool to add a tilt shift effect to the scene, which adds a soft blur to selected areas of the photo.


We hope these tips will help out Martha and all the other budding food photographers out there! Have you edited any great food photos with Aviary lately? Be sure to show them off via Twitter or Instagram and tag them with #Aviary - we'd love to see them!