phoenix — Archive — Aviary Blog

phoenix

The Weekly Birdbath for August 13th - 19th

 
August 13th - 19th, 2011
by Cobra405/Mizagorn/Redstar/Mpeutz

Editor's note: This is a special edition of the Birdbath. We Aviators decided to make this one a tribute to all the wonderful female artists and musicians within our flock. You'll find that equal opportunity and talent indeed apply.

Girls rule!!

A great example of Roc and Myna integration! Drummergirl777 created four original Roc beats of her own, then used Myna to upload a few external sources and add sweet reverb and sweep effects to give kick and punch to a thoroughly enjoyable listening experience. Synth and percussion make this a perfect match for her name. If you listen closely, you can hear the "Roc... Roc.." in the mix. How cool is that?!

Need some exquisite vocals to go with the new mix you're working on? Have you heard what Roxy (mwah ha ha ha ha!) can do? Some of the best Myna creations we've heard at Aviary are based on these simple, yet beautiful, soul-stirring and sometimes quite spine-tingling "ah's" and "mmm's". Check it out, or wish you weren't so far back in line.

There is a cool Aviary contest going on at Worth1000,one everyone will enjoy. It is All apps black and white. Check it our and join in the fun.

Sometimes, in the great walk of life, we run across a truly profound figure. One who is eclectic and astonishingly, refreshingly different. Someone you can learn a lot from, as well as laugh with. A true artiste, experienced in an amazing variety of art forms.

Entre nous, et tous les autres - bassp is a veritable fountain of cultural experience. Her art "studies" at Aviary are worth more fave adds than the common folks' finest creations. She has a professed and perfectly practiced proficiency in Peacock - Nobody can say "hubs" and interact with them quite as well. And wow! - you won't know whether to stand, sit, or fall out when you browse her gallery. Can she create a beat? Well... duh! Any Girl Scout will tell you - be prepared!

Having a lot of challenges has both advantages and disadvantages. We love the variety but sometimes, some are overlooked. Such is the case of Yellowstar24's great challenge named The wrong habitat. Funny and original, we challenge you to join us in making this another Aviary favorite.

As the end of summer hurtles toward those of us in the Northern Hemisphere, we begin to see some friends dropping off as the new school year approaches. Whether teaching or learning, we wish everyone a prosperous school year ahead. In that spirit, let us also remember to welcome our new members and remember to point them here so we can all say hello as they introduce themselves.

We can't let the guys go without any representation this week. When Alpha13Wolf posed his amazing Clearing skies I thought it was amazing but when I opened it in Peacock, I was inspired to learn this technique. Little did I know that you can make much more than clouds. Alpha13Wolf has written a wonderful Tutorial that shows us every thing we need to create clouds, smoke, nebulas, trees and anything else you can imagine. Many thanks to you Alpha13Wolf!


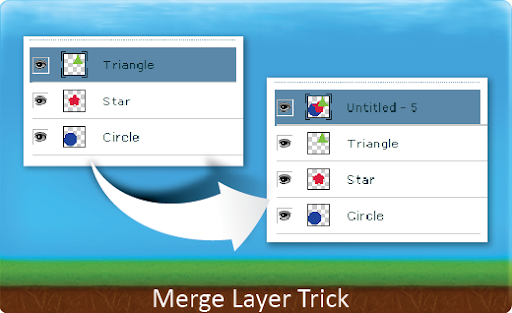
Tip - Layer Merge Trick

Select the layers you want to resize and merge them. Then, with the merged layer selected, go to Select > Select all. Next use the Edit > Copy function to copy this layer to the clipboard. Now here comes the clever bit :) Hit undo twice. This will recover all of your layers as they were before you started! Finally, just use Edit>Paste and hey presto, you now have a new layer with the merged layers you copied. You can resize all you like, and you also still have all of your original layers!

Tip Repository

Tip Tuesday: Coloring Line Art

This week's tip shows you a quick and easy way to add color to your sketches and line art. It's really useful for comics, logo art, and anything else hand-drawn you want to spruce up professionally. Enjoy! [youtube width="550" height="344"]http://www.youtube.com/watch?v=b7e0G93sqw0[/youtube]

Tip Tuesday: Enhancing Eyes

This week's tip will teach you how to enhance the eyes within your portraits - something  a lot of Aviary artists have asked us for help with. We have a full written tutorial on this technique that explains some additional steps to make the eyes stand out in your images, but this video should be helpful as a quick method for achieving the look you want! [youtube width="550" height="344"]http://www.youtube.com/watch?v=Vf802aCIE4o[/youtube]

Tip Tuesday - Effect Smart Layer

Learn how you can add bitmap effects to your Raven vectors with this week's video tip.

Tip Tuesday - Text Smart Layer

In this week's video tip, we cover how to get text into your Peacock creations! [youtube width="550" height="343"]http://www.youtube.com/watch?v=Edeip3e5GdQ[/youtube]

Tip Tuesday - Vector Masks

Over the next few week we will have video tips on the previously mentioned Smart Layers. These tip will showcase ways to utilize smart layers to extend the editing power of the applications. This weeks tip in on creating vector layer masks using Smart Layers. [youtube width="560" height="349"]http://www.youtube.com/watch?v=aVwJTAdFIdU[/youtube]

Super Suite Updates!

Today we released more great updates for some of the apps in our flash suite: Roc (music creator), Myna (audio editor), Phoenix (image editor), and Raven (vector editor). Details below! Note: If you’ve signed up to be an alpha tester, this update won’t be huge news to you, but you can head over to the alpha testing changelog to get a peek at what’s coming up next :)

Roc

The last update of Myna included a built-in version of Roc which allowed you to create and edit beats directly in Myna. Today's update brings a couple more exciting new features:

  • Change the tempo with the traditional dragging method, or with the new arrows for more precise results.
  • A completely overhauled instrument panel! Sort by instrument or category, and enjoy the new alphabetical organization for easier searching :)

We've also updated the standalone version of Roc with some features that previously were only available in the version within Myna: shorter sound names, instrument names on each track, and a collapsible sidebar.

Myna

Enjoy all the new functionalities of Roc-in-Myna, plus copy and paste effects from one clip to another (a much-requested improvement). You can access this new feature from the context menu.

Phoenix

Some major performance improvements for the tools:

  • Improved brush, eraser, dodge/burn, and clone tools
  • Added flow parameter to brush tool: set how much color is being laid down by the brush
  • Improved edge burning on soft brushes
  • New eyedropper shortcut: press shift with the brush or paintbucket tools selected to sample colors

This version of Phoenix will also allow you to paste in copied bitmaps! This means, for example, that you could just copy a picture from a website and paste it into the image editor instead of having to download and import the image. We think this will improve your workflow greatly :)

Raven

  • Save .egg files to your desktop and load them whenever you want to continue editing. This is a great option for backing up your files, or for those times when you need to save your creations quickly. (This is also currently available in Phoenix. We're working on rolling it out to all apps!)
  • You can now save path filters. Phew!
  • Added path operations: union, subtract, difference and invert. You can find these under the menu "Path operations." To use them, you must have 2 path objects selected.

To try these new features out, just launch any of our apps and get to it! As always, if you can’t wait to see the next wave of features, feel free to try them out before they're officially released by signing up at www.aviary.com/alphatester.

We love your feedback - whether it's an exclamation of joy or a suggestion for how we could do better. Let us know what you think of these new features!!

Duktee's Aviary Add-on for ExpressionEngine

Duktee builds creative add-ons for ExpressionEngine, a sleek web publishing system, based off of available APIs from around the web, or simply from inspiration to empower others. With a variety of add-ons in their arsenal, including a video player, a Mailchimp extension, a SEO rank tracker and more, Duktee is on a mission to provide top notch add-ons for Expression Engine users.

Duktee’s latest add-on is powered by Aviary, featuring 4 of our web apps - Our Simple Image Editor, Advanced Image Editor, Vector Editor, and Effects Editor. Our Simple Image Editor gives you instant access to basic quick-edits like blur, brightness, rotate, crop, etc, and let’s you edit and save the files you’re working on, on the fly. On top of that, you’ll be able to access the other 3 editors from the file manager in the control panel. A suite of powerful image editing tools at the click of a mouse!

Visit Duktee.com to learn more about their Image Editor add-on, or to see their entire gallery of sweet tools!

Our Image Editor, Phoenix Our Vector Editor, Raven Our Effects Editor, Peacock

This add-on is a perfect example of how our API's can be used to power anything you want, whether it’s an extension for a popular platform, or a module for your personal site!

If you've integrated any of our API's onto your site, let us know at api@aviary.com. If you're a developer and would like to try it out, get an API key, read the technical documentation, or use it on your site, check out our Simple API and the Effects API documentation!

Make Your Own Paper Phoenix Toy

Custom Paper Toys, I decided to put together a paper cut-out template of our fine feathered friend, Phoenix, that you can cut out and assemble yourself!

To begin, open the Paper Phoenix template here.
Feel free to make any edits you desire using Raven's powerful vector drawing tools.

New to Raven? Here's a tutorial on the basic functions of Raven to help you get started creating vector art.

Then, save the image to your computer using the File > Export > Export Bitmap function then follow the onscreen instructions to save the image.

Print the downloaded image on your printer (refer to your printer documentation if you don't know how!), preferably on card stock.

Next, cut the individual pieces out and perforate the slits marked on the pieces by short black lines, using an X-acto knife.

Then it's all a matter of assembling the figure!

Begin by gluing, or taping, tab A to the inside panel of the head shape. Close the box by affixing the B and C tabs to form a box for the head.
For the body segment, glue tab D to the inside panel of the body to form a box as well.

Fold down the tabs on the leg segments and glue tabs E and F to the inside panel of the body to form the figure's legs.

Insert the arm segments into the sides of the body, and place the tab on the egg into the slit on the Phoenix's left hand.

Finally, attach the head and body segments together by inserting the J tabs into the slits on the bottom of the head segment, and insert the K tab located on the headdress segment into the slit on the head to complete the piece.

And that's it!

Just because Aviary is a suite of web-based design tools, it does not mean you're limited to digital designs.
I'm hoping this post can kick start your own ideas of other real media projects you can create using Aviary.

Have fun!]]

Enhancing Your Etsy Photos using Aviary’s Online Photo Editor

(*statistic might be made up)

In this post, I'll be showing how to correct common photo problems using Phoenix, Aviary's free, online Image Editor. So you won't even need expensive photo editing software!

Help! My photos are too dark!

One of the most common problems users run into is with exposure. For extreme cases of photos being overly dark or bright, you may need to re-shoot your photograph. But often times, you can adjust the brightness in Phoenix.

First, launch Phoenix and select "Load existing file" to upload your photograph into the program.
I would recommend doing your adjustments on a duplicated layer (Layer > Duplicate Layer), so you"ll always have your original photo on a separate layer in case you want to undo the adjustments you made.

To adjust the brightness of your photo, open the Brightness & Contrast dialog from the Image tab. Slide the Brightness slider to the right to make the image brighter if it's too dark, and slide it to the left to make the image darker if your photo is too bright. Additionally, you can raise the Contrast by using the Contrast slider as well. When you are satisfied with the results, click Ok to apply the adjustment.

My photos are too blue!

Often times, taking your photos in natural light may create a blue cast over your image. You can fix this problem by adjusting the channel levels in your photo. Open up the Levels dialog from the Image tab.
In the Levels dialog, you will see a preview of your image with your Levels adjustments, on the fly. Select Blue from the Channel dropdown. You will see three sliders in the dialog. Slide the midpoint slider to the right, which will control the brightness and darkness of the selected channel.
The left slider will control the lightest areas of your channel, while the right slider will control the darkest.

Play with the settings until the blue cast is removed from your image, then click Ok to apply the adjustment.

You may also need to raise the Brightness & Contrast (from the Image tab) to fix the overall exposure of the image.

Alternately, if you find your indoor photos appear to have a yellow cast, you can adjust the Red and Green Channels in the same way.

How do I create clean white backgrounds in my photos?

It is desirable to use clean, simple backgrounds for your products, as not to distract from your items.
To enhance the brightness of your white background, first adjust the Brightness & Contrast (from the Image tab) of the entire image. For my image, I raised the Brightness by 20 and raised the Contrast by 33.
You can also use the Paintbrush Tool with the foreground color set to white to spot clean any undesirable areas, such as creases. Create a new layer (Layer > New Layer) and use the Paintbrush Tool to paint directly over the areas you want to "white out".

How do I create Depth of Field in my photos?

Using the Blur Tool, you can blur distant elements in your photos to create the appearance of depth of field. The Blur Tool can be found docked with the Smudge Tool. Select the Smudge Tool to bring up the tool's options flyout, then select the Blur Tool.
Paint over the distant elements with the Blur Tool, set with a lower Hardness level of 10-20, to create the effect.

How do I crop my photos in Aviary?

Cropping photos in Aviary is a simple job! To crop your photo, select the Rectangular Selection Tool and drag it around the area you want the image to crop to. Don't worry if you are not happy with your selection. You can always deselect (Select > Deselect) and try again!

Once you are happy with the selection, select Image > Crop Selection to crop your image to your desired area.

A couple notes on resizing for Etsy:

Etsy will resize your image to 430 px wide in your listing, so make sure your image is at least that size or larger. To check the size of your image, select Image > Resize Image to check the proportions of your image.

Etsy will also generate 155 x 125 px, and 75 x 75 px thumbnails from the center of your image, so be sure to include all the pertinent elements of your photo where it won't be cropped in the thumbnails.

(For additional tips on cropping your photos, check out our tutorial on Compositional Cropping!)

How do I sharpen my images?

To create a nice, crisp look to your photos, you can sharpen your photos a couple different ways.
The first method is to simply duplicate your layer (Layer > Duplicate Layer), and apply the Sharpen filter to it. The Sharpen filter can be found under the Filter tab.
The filter will apply a very harsh sharpening effect to your layer. But don't fear! By adjusting the Alpha of this layer from the Layers panel, you can adjust the amount of sharpening you apply to your image.

Phoenix also allows you to sharpen only the edges of your image.
Instead of applying the Sharpen filter to your duplicated layer, apply the Find Edges filter.

The image will look all funky at first, but do not feat! Simply set this layer's blend mode to Screen from the Layers panel to apply precision sharpening!

When you're finished editing your photo, select File > Export Image to export your creation to your computer all shiny and ready to upload to Etsy!

As each image will need a different approach to processing, the best practice is to experiment with the various methods and see what's best for your particular photo!
You can upload up to five photos per item, so play around with different angles and crops to give your buyers as many views of your items as possible!

Happy sales!]]